
Y-stern Canoe Full Restoration and Foam Ribs

The project this time is the rebuilding and restoration of a 16 foot Y-stern polyester fiberglass canoe that had begun being stripped for restoration. This particular canoe has been an interesting rebuild because of the state in which it arrived and the desired finished result and how to bridge this gap. This canoe was sand blasted by its owner to remove damaged and crazed green gel coat. The client, Bob, wanted the canoe restored so that his kids can continue to use it because they have long endearing memories of this canoe. It was decided that the canoe would require straightening, foam rib internal reinforcement and exterior fiberglassing, fairing and paint to have it water worthy again. The customer was happy to paint the hull interior and exterior surfaces at his shop so long as the structural work was complete and the hull exterior reasonably ready for primer and paint. This is where BoatCraft/ Timber Boatworks began the restoration. Videos of the construction of this canoe are available on Youtube on the Timber BoatWorks channel.
The canoe arrived with a particular set of issues that required more structural work than I have done in the past. The downside this aggressive sand blasting is that the gel coat was removed along with a lot of the polyester fiberglass on the hull exterior which left pitting and holes through the hull. The hull was so thin that certain areas were cleanly removed and most of the roving on the hulls interior surface was exposed. This puts a repair technician in a difficult spot because the canoe is not stable enough to hold its shape and the old polyester resin has been exposed to significant UV damage and cannot be relied upon for structure anymore. The hull would have to be strong backed and put on stations to straighten the hull and stabilize it enough so that it could be rotated and carried without further damage.
The downside this aggressive sand blasting is that the gel coat was removed along with a lot of the polyester fiberglass on the hull exterior which left pitting and holes through the hull.
The stations were assembled a combination of a Prospector and Red Bird canoe stations at the shop in combination with shims to make it reasonably close to the proper shape. The stations were added and the strongback installed before any resin was applied, it would be easier to push thin old fiberglass into position instead of adding fiberglass just to sand it away to make the desired shape. The stations were added every 14-16 inches and many shims and ratchet straps used to pull the hull into shape. This is tedious work because tension on one part of the hull will warp another section but once everything is correct fiberglass can be added to stiffen the hull in a new shape. The old roving and polyester mat hull are only going to be used for shape and core of the new fiberglass. The new layers of cloth and epoxy will carry the full load of the hull since the old fiberglass is cracked, UV damaged and brittle.

The next step is stiffening the hull exterior in the new shape of the strong back and stations. I chose to use polyester resin for this step because I will still have so sand much of the hull away to refine the shape of the hull exterior. The stations allow the technician to begin applying more fiberglass without the risk of the hull cracking worse because of the heat and shrinkage of fiberglass resin. Too thick an application of polyester fiberglass resin can overheat, warp and crack the hull from shrinkage. The canoe is already very fragile so some fiberglass has to be applied to make the hull manageable. Most of the hull warping and holes were on the three keels and center of the hull, so strips and patches were added to stabilize the hull. Once the keel area is rigid and straight then we can begin working on the foam ribs and interior fiberglass before concerning ourselves with the smoothness and fairing of the hull exterior. Polyester resin was applied with 6 ounce e-glass woven fiberglass cloth so that there would be a thin layer of material added without requiring a large volume of resin. This initial stage resulted in a rigid straight keel line and a hull that could be rotated without falling apart or cracking.
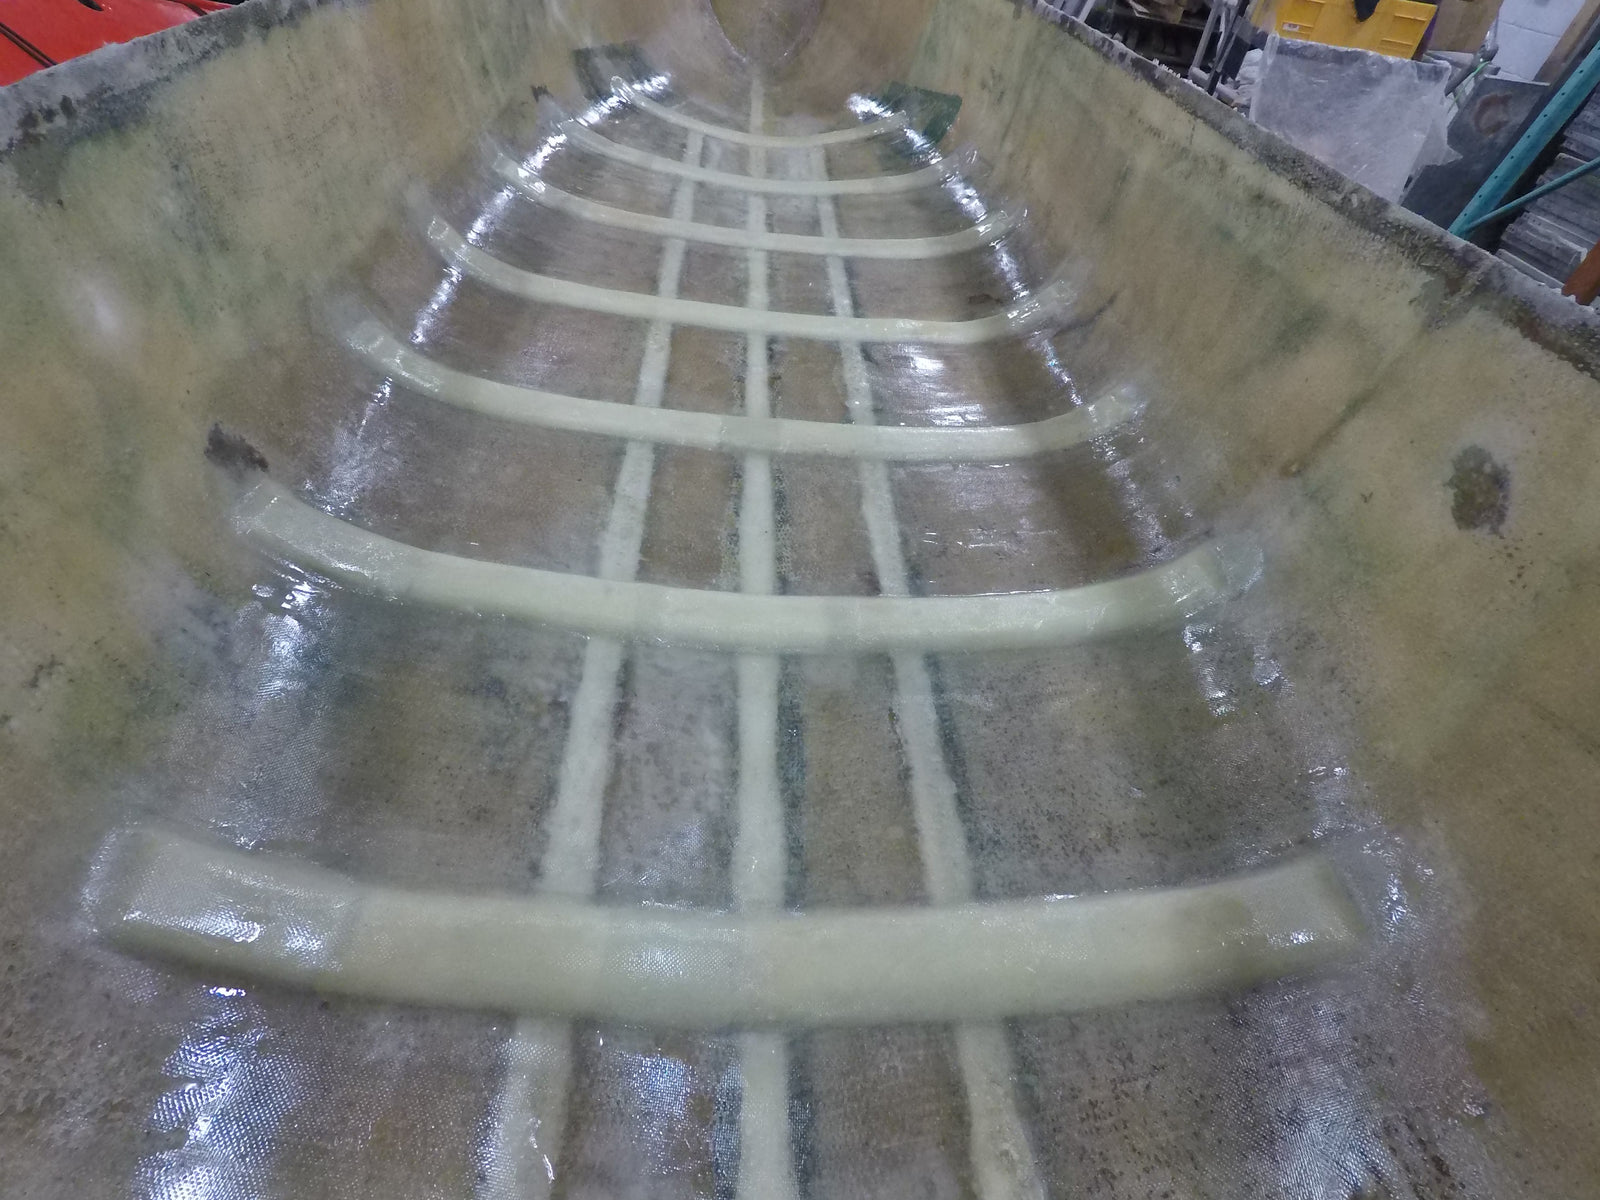
The next stage of the build was adding the foam ribs and reinforcing the hull interior with two layers of fiberglass cloth and epoxy. The inside of the hull surface was heavily pitted and had some resin leak through the holes in the hull from the previous step. The hull interior has to be sanded and acetone wiped before epoxy can be applied. Polyurethane pour in place expansion foam is poured in the keels, allowed to cure and sanded smooth before the ribs are added. After this 6 ounce fiberglass is applied in a football shape to the lowest part of the hull interior and trimmed where it begins to be vertical on the canoe chine. This lower layer of fiberglass solidified the hull and gives us a smooth ideal surface to begin adding foam ribs and fiberglass. The old hull material cannot be trusted to have any strength at this point, so the first structural layer will be the 6 ounce fiberglass and West Systems epoxy with a slow cure hardener. Once fully cured and sanded the foam ribs will be bonded to this new epoxy and fiberglass, which will be stronger than laying foam ribs to the old roving on the canoe interior.
https://boatcraft.com/collections/west-system-epoxy
https://boatcraft.com/collections/fibreglass-cloth-and-mat
After this 6 ounce fiberglass is applied in a football shape to the lowest part of the hull interior and trimmed where it begins to be vertical on the canoe chine.

Next 2 inch by ½ inch foam ribs are cut out of insulation foam and 1708 and 6 ounce fiberglass strips are cut to laminate the foam to the 6 ounce football shape on the canoe interior. The center of the canoe is measured and marked, then every 12 – 14 inches from the center towards the bow and stern a foam rib will be added. 1708 is biaxial fiberglass cloth that when put into three-dimension shape is extremely rigid, however its downside is that it is quite thick and required more epoxy to fully saturate it that what 6 ounce fiberglass requires. For this canoe I had to cut seven foam ribs at different lengths to be tack sprayed to the canoe markings make ever 12-14 inches along the internal keel. The foam ribs can be tack sprayed into place with 3M spray 77 which does not affect the epoxy bond, some tack sprays are not compatible with epoxy and lead to delamination or poor bonding. The foam ribs are then sanded in a rounded shape and cut to length. 1708 is then applied over each rib. The 1708 is very thick so I saturate the 1708 on a plastic sheet and then flip it to saturate the front of the 1708. The 1708 is applied over the foam rib with the biaxial weave on the visible side. After this the 6 ounce fiberglass strip is applied over top of the 1708, the 6 ounce strip has to be one inch wider and one inch longer than the 1708 strip. Each layer of fiberglass requires one inch overlap wider than the previous layer. Once the ribs are fully cured, they are sanded before the second layer of fiberglass is added from gunwale to gunwale.
The 1708 is very thick so I saturate the 1708 on a plastic sheet and then flip it to saturate the front of the 1708.
The final layer of fiberglass is added to the hull interior which unifies the gunwale to gunwale internally. Since the roving on the hull is all that remains from the original hull, extra new fiberglass has to be added to the hull interior. This fiberglass does not have to be one single piece of fiberglass, so long as the layers overlap by one inch and they are fully saturated the fiberglass can be applied in pieces. Once this is complete and cured the hull is fully reinforced, but the hull exterior is still very rough, uneven and textured from the old polyester hull.
On the hull exterior two layers of 6 ounce fiberglass and epoxy are applied. The hull exterior is always more time consuming than the hull interior because any waves on the hull exterior will be visible in the paint. The hull exterior is a refinement process, as the more layers are applied the hull has to get smoother in preparation for paint. This does take a bit more time, but wavy paint will always be critiqued even if the structural work is sound. Take your time to sand the old hull very smooth before applying the first layer of cloth, you cannot always body fill waxy fiberglass and too much filler will add weight. The first layer of cloth will be applied smoothly and sanded. A second layer of fiberglass was applied from the bow stem over the three keels to the stern since this is a high impact area that will be hit during use.

The final part of the restoration for Timber Boatworks was applying and sanding the primer. The reason that I chose to prime the hull as the fiberglass is partly transparent when saturated, so it is very had to remove all the orbital sanding marks and make the hull paint smooth and fair. The Interlux Prekote Primer is intended to be sanded smooth before the next paint is applied, so this is only a metric to help visually see imperfections and remedy them before the client paints the canoe. The primer was sanded and applied twice to refine the hull.
